Thursday, August 29, 2013

Squash Blossom Pancakes


I love the sight of the first zucchini blossoms blooming. It means that summer is in full swing, local vegetables are on their way and I can make one of my favorite summer snacks.
 
On a trip to Rome and the Amalfi Coast with my parents back in 2004, I was so excited to see squash blossoms or 'fiori di zucca' on so many menus. I had it sauteed in pasta and stuffed with cheese and deep fried. The latter is how you will find it on most menus in the US (hopefully with an anchovy tucked inside!).
 
I remember another time, visiting my younger sister in Maine. We spent the day hiking in Acadia National Park and then stopped for a nice dinner outside of Bar Harbor, changing out of our sweaty clothes in the back of her car. Most people would probably look forward to something hearty after a long, hot strenuous day of hiking but we immediately began to salivate at the sight of stuffed squash blossoms on the menu.
 
If you search the web, you will find endless recipes for stuffed blossoms but I prefer these pancakes, a recipe from my Aunt Marian, as they highlight the nutty flavor of the blossoms rather than masking it with a blob of cheese (though that's good too). These were enjoyed as a side dish to our Mixed Hamburgers on Friday night of our cooking weekend.
 
 
Ingredients:
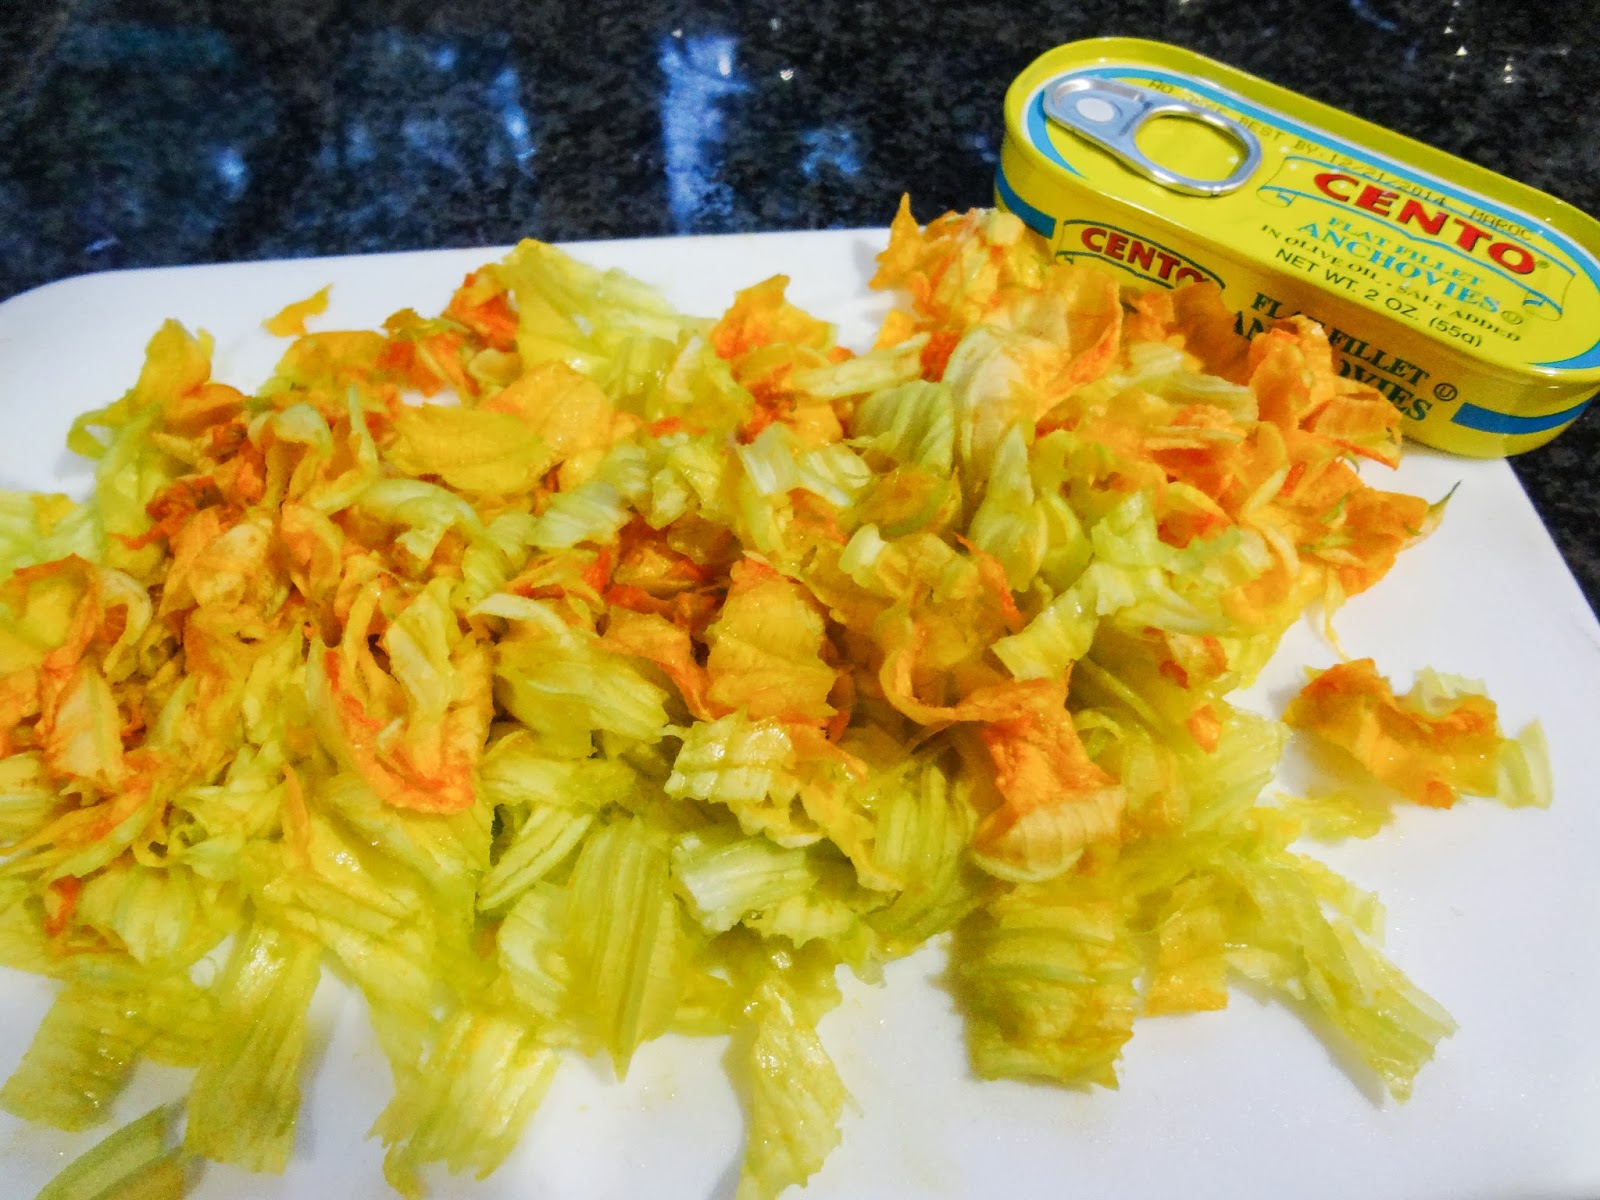
20 squash blossoms cut into small pieces
1 1/2 cups flour
2 tsp baking powder
1/2 tsp salt
1/2 tsp pepper
1 cup water
1 egg
grated cheese
1 can chopped anchovies (optional - omit salt if using)
 
 
When picking squash blossoms, make sure to do so early in the morning and try to only pick the males. For those of you who slept through biology, the female flowers will yield the fruit, or in this case, the squash. The males (useless once they do their pollinating - ha!) will be attached to a long, skinny stem as opposed to the females who will be attached to a bulb or the beginning of a squash.
 
If you don't have access to a garden, I have seen squash blossoms at larger farmer's markets and at Whole Foods, usually in July.
 
The boys
 
 
To prepare, cut of the stems, slice open and remove anything inside.


In a bowl, mix flour, baking powder, (salt) and pepper. Add egg and water and beat with a fork until smooth. Add flowers, anchovies, and grated cheese. Mix well.
 
 
Batter
 
 
Fry in oil, using a serving spoon to place batter in frying pan.


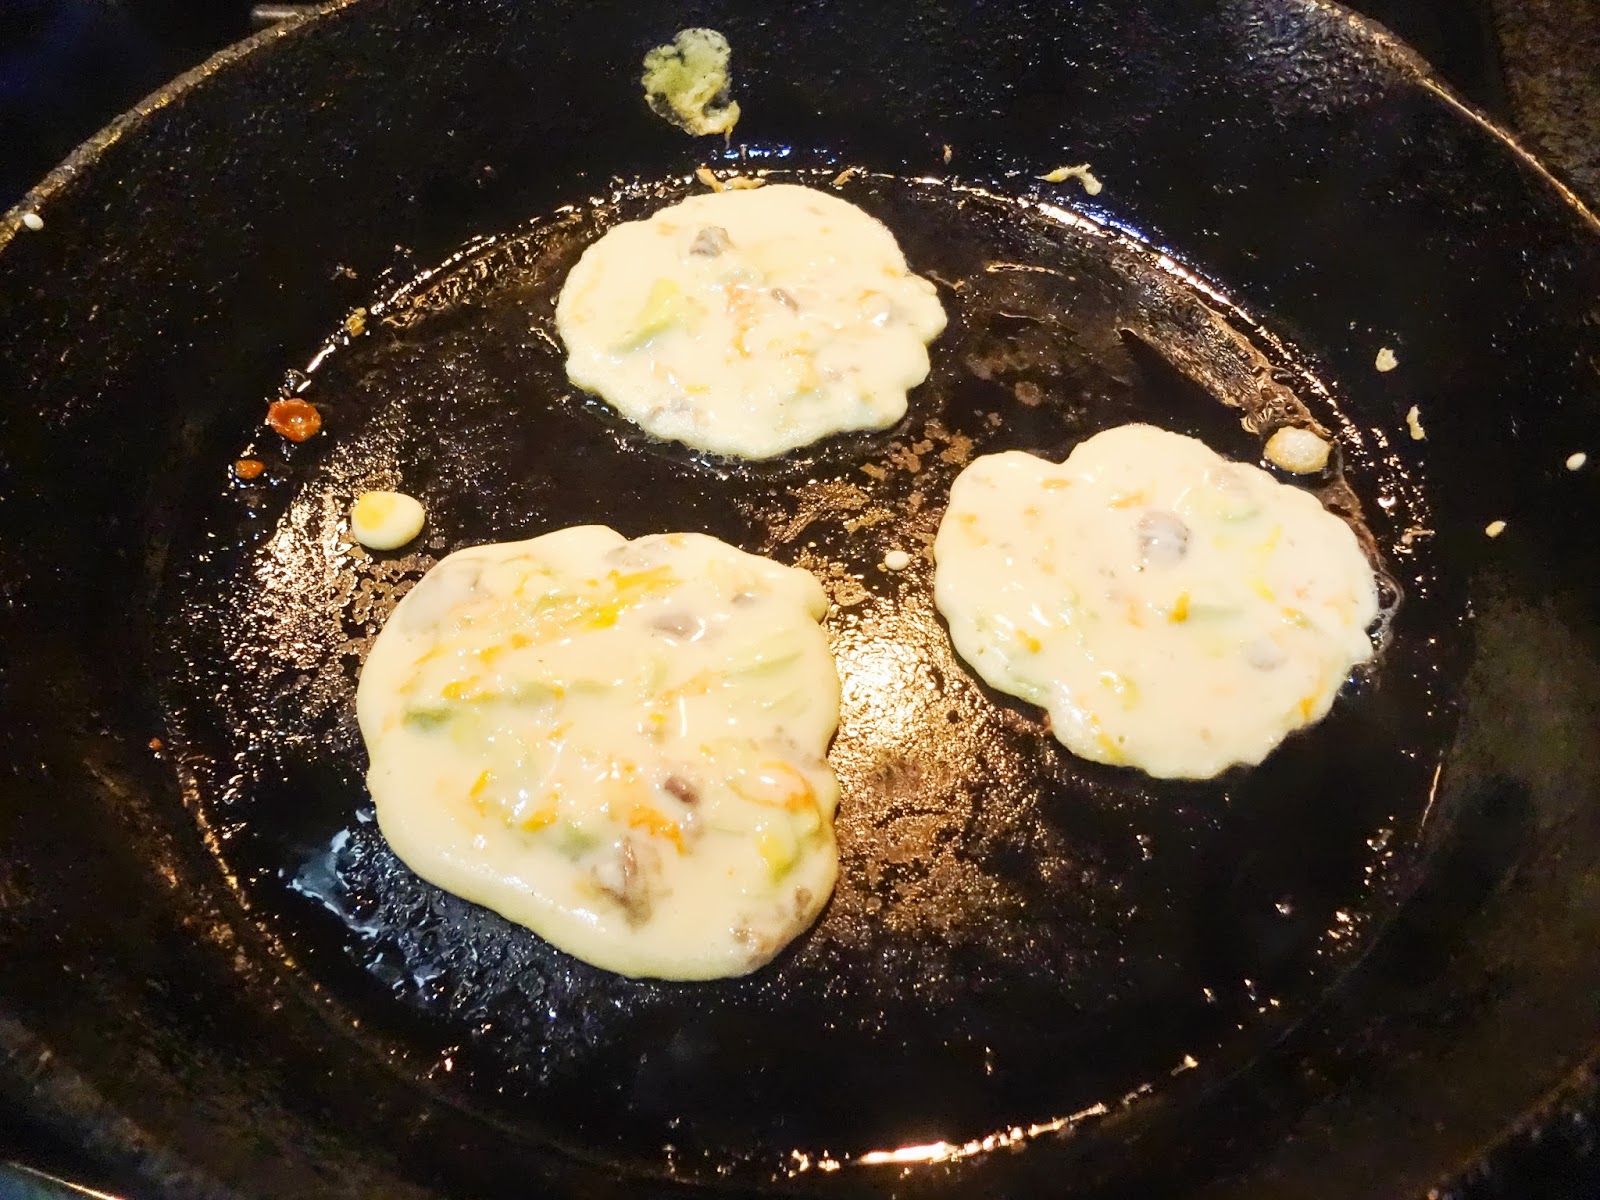
When edges brown and bubbles break on top (like pancakes), turn, and brown on other side.
 
Serve immediately and enjoy !


Tuesday, August 27, 2013

Mixed Hamburgers


Every Saturday night, my Grandfather made Mixed Hamburgers. These mini burgers are basically meatballs made into patties. Little did my grandfather know but he was way ahead of his time. These days you find "sliders" on many menus from pubs to fine dining and that is essentially what these are - meatball sliders.

Incidentally, he also liked to serve them alongside a can of Chef Boyardee. This was in no disrespect to his Italian roots I'm sure but rather his solution to "Dad's Night To Cook" while still having time to spend with the family after a long week working in the city.

And so, Mixed Hamburgers made an encore appearance at Friday night dinner during our cooking weekend at Cape Cod. Unfortunately, Chef Boyardee couldn't make it.
 
 
Ingredients:
1-1 1/2 lbs ground beef
3 slices of white bread
1 egg
1/4 c grated Parmesan cheese
2 tbsp. fresh parsley, chopped
 
Place the bread in a food processor and pulse to make fresh bread crumbs.
 
Combine with the remaining ingredients and mix well - hands work best.


Form into mini hamburger patties (or make a meatball and then smash it flat !)
 
 
Smashing!
 
 
Smashed
 
Fry on the stove or electric frying pan or grill.
 
 
Jane showing her frying skills (Martha supervising?)
 
Serve on mini buns with toppings of your choice.
 
************************************************
 
(.......and from the cutting room floor......)
 
My mom explaining why the heck she bought such a large jar of pickles.


Tuesday, August 20, 2013

Antipasto


I'll begin my Martorana Cooking Weekend posts the way most Italian holiday meals begin - with Antipasto. Literally meaning "before the meal", its a way to curb your guests' appetites while the aroma of Roast Turkey or Sunday Sauce fills the air.

Antipasto was always a part of our holiday meals no matter at whose house we gathered and we still follow that tradition today - every time, no question about it.

Traditionally, antipasto is a mixture of pickled vegetables, meats and cheeses. In my family, we always include the exact same things, and always served on a dish especially made for antipasto, with separate compartments (so that your pepperoni doesn't taste like anchovies) and with small dishes and teeny, tiny forks.
 
My mother and I were in Italy just before my brother got married. We were in a ceramic store on the Amalfi Coast looking for something to buy as a shower gift. As soon as we spied an antipasto dish we knew it was the perfect choice. No better way to teach the newest family member what was expected before Easter Dinner !
 
It was only natural to enjoy some antipasto during our weekend at the Cape. We included the usual store bought items: anchovies, artichoke hearts, olives, pepperoni, sharp provolone and made two from scratch which you will find directly after this post: Marinated Mushrooms and Roasted Peppers.
 
So good - every time !
 
Curbing appetites
 
 
Aerial View


Marinated Mushrooms


Ingredients:
1lb fresh mushrooms
1/4 cup wine vinegar
1 tbsp. chopped parsley
1 clove garlic, cut in half
2 tbsp. olive oil
1/2 tsp. salt
1/4 tsp. oregano
Dash of pepper

Wash the mushrooms and cook in a small amount of boiling salt water until slightly tender, about 5-10 minutes.


Drain and add to a bowl with the remaining ingredients.
 
The remaining ingredients


Marinate in the refrigerator over night. Remove the garlic before serving.


Roasted Peppers


Ingredients:
Bell peppers (any color)
Olive oil
Fresh garlic, minced

There are many techniques for roasting peppers. In the old days, they would hold them over the open fire of a wood stove. The modern equivalent would be the open flame of a gas stove (using tongs of course). A much simpler way is to lay them flat under the broiler.
 
Cut the top off of the peppers, cut in half lengthwise and remove the seeds. Place skin side up on a cookie sheet and press down so that they lay as flat as possible. 


Broil on high until the skin becomes mostly black and blistered. WATCH THEM. They should take between 5 and 10 minutes.


Remove from the broiler and place them in a paper bag. This will allow them to steam and the skin will come off much easier. Wait 15 minutes, remove from bag and rinse under cold water while rubbing the skin off with your hands.
 
Cut the peppers into slices and toss with garlic and olive oil. Refrigerate over night.


Tuesday, August 13, 2013

Martorana Cooking Weekend

Eat, Play, Love
 
That's exactly what I had the pleasure of doing one recent weekend this summer with my Mom and her 4 siblings. My Aunts Marian, Martha and Jane and Uncle Frank all travelled to my parent's house on Cape Cod for a weekend of cooking, storytelling, eating, drinking and even a little impromptu dancing.
 
They don't look much different now (Jane, Carolyn, Frank, Marian and Martha)

 
The weekend began with a review of the menu (in case anyone thought they would get out of actually cooking).
 
 
Everyone was eager to start and so I handed out some "I'm Italian" aprons and we got to work.


We shared and cooked some of our favorite family recipes telling stories about the past and their place in our family lore.
 
We cooked our way right through the weekend with some time off for shopping and the beach on Saturday and a little more shopping on Sunday (after which we may have also stopped for a cocktail- c'mon we worked hard!) 
 
 Cooking my way through these family recipes can be a bit of a lonely process and I've been happy to share them with guests and co-workers on occasion. But to be able to cook them alongside family and learn from those who have helped pass them down ? Priceless.
 
Thanks to my Mom, Carolyn for being the logistics-queen that she is and for doing all of the shopping and lending her kitchen, to Marian for her Italian-cooking expertise and her home-canned tomatoes, Martha for her humor and plethora of stories, Jane for her sous chef skills, pictures and family history and Frank for spending his weekend with a bunch of woman and doing the least popular job of manning the deep fryer. Thanks also to my Dad for putting up with all of us and for of course, tending bar.
 
I look forward to sharing the results of our labor on these pages and keeping the Martorana culinary quest alive.
 
Thanks again to Team Martorana - I had a blast !


Stuffed Zucchini


Late summer means lots of great vegetables from the garden or farmer's markets. My father had a huge garden in our backyard in Glen Rock. He always grew tomatoes, peppers, string beans and zucchini among other things. He has an equally large garden today at my parent's house on Cape Cod. He tends to it like a delicate piece of art resulting in beautiful, colorful and delicious produce.
 
This is one of many zucchini recipes made in the Schmitt household and the one I make at the first sign of local squash. The zucchini is hollowed out and stuffed with onion, tomatoes and cheese - it tastes like summer !


Ingredients:
1 medium zucchini
1 small tomato
1 small yellow onion
salt and pepper
1 oz Swiss cheese, grated or cut into small pieces
Parmesan cheese, grated

Local is best
 
The first thing you need to do is hollow out the zucchini "boats". Cut the ends off the zucchini and then in half length wise. Using a small spoon, scrape out the soft pulp and seeds. Chop the flesh into small pieces and set aside.


Blanch the zucchini halves in boiling water for 3 minutes and remove.


Meanwhile, chop the onion and tomato.


Heat the olive oil in a medium skillet. Add the tomatoes, onion and zucchini flesh and sauté until the onions are just beginning to brown.


Turn off the heat and add the Swiss cheese until just beginning to melt.


Spoon the mixture into the zucchini boats and sprinkle with Parmesan cheese.


Bake at 350 degrees for 20-25 minutes or until the top is lightly brown.